Kalibreren van de Arta-2.1 unit
Het kalibreren van de Arta-2 meetunit met Arta is een belangrijk proces om nauwkeurige metingen te kunnen uitvoeren aan versterkers. Hier is een samenvatting van de stappen die je moet volgen:
- Referentie instellen: Gebruik de vermogensmaat decibel (dBV) als referentie. Voor deze kalibratie wordt 0 dBV gelijkgesteld aan 1 Vrms.
- Meetomstandigheden: Buizenversterkers moeten worden gemeten bij 1 Watt, wat overeenkomt met een normaal luisterniveau. Voor luidsprekers betekent dit een gemiddelde geluidsdruk van ongeveer 90 dB op 1 meter afstand.
- Spanning en impedantie: Bij een luidsprekerimpedantie van 4 Ohm gebruik je +6 dBV (2 Vrms), en bij 8 Ohm gebruik je +9 dBV (2,83 Vrms).
- Kalibratieformule:
Voor 4 Ohm luidsprekers geldt de formule:
Voor 8 Ohm luidsprekers geldt de formule:
- Kalibratie van Arta: Er mag geen versterker of losse kabels op de Arta-unit zijn aangesloten. Zorg ervoor dat de meting bij 1 kHz 0 dBV aangeeft in het programma Arta onder de knop SPA (Spectrum Analyzer). Dit moet resulteren in een uitgangsspanning van precies 1 Vrms aan de Arta-2 meetunit zonder signaalverzwakker.
Wat hebben we nodig om te kalibreren?
Calibration of the Arta-2 Unit
The calibration of the Arta-2 measurement unit with Arta is an important process to perform accurate measurements on amplifiers. Here is a summary of the steps you need to follow:
- Set the Reference: Use the power unit decibel (dBV) as a reference. For this calibration, 0 dBV is equivalent to 1 Vrms.
- Measurement Conditions: Tube amplifiers are measured at 1 Watt, which corresponds to a normal listening level. For speakers, this means a sound pressure level of approximately 90 dB at a distance of 1 meter.
- Voltage and Impedance: For a speaker impedance of 4 Ohms, use +6 dBV (2 Vrms), and for 8 Ohms, use +9 dBV (2.83 Vrms).
- Calibration Formula:
For 4 Ohm speakers, the formula is: 2 Vrms × 2 Vrms / 4 Ohms = 1 Watt
For 8 Ohm speakers, the formula is: 2.83 Vrms × 2.83 Vrms / 8 Ohms = 1 Watt
- Calibration of Arta: No amplifier or loose cables should be connected to the Arta unit. Ensure that the measurement at 1 kHz shows 0 dBV in the Arta program under the SPA (Spectrum Analyzer) button. This should result in an output voltage of exactly 1 Vrms at the Arta-2 measurement unit without a signal attenuator.
What do we need for calibration?

Benodigdheden:
Een digitale multimeter die frequenties van 1 kHz of hoger kan meten. Veel multimeters gaan niet verder dan 200 of 400 Hz. Als je multimeter niet geschikt is, moet je ijken op 200 of 400 Hz.
Windows aanpassingen:
1. Klik met de rechtermuisknop op het luidsprekericoontje rechtsonder in de hoek van je beeldscherm (Windows 10) en selecteer "Geluidsinstellingen openen".
2. Ga naar "Configuratiescherm geluid" rechtsboven in je beeldscherm.
3. Open het tabblad "Afspelen" (line out) en "Opnemen" (line in).
4. Onder "Afspelen" selecteer je "Speakers" en ga naar "Eigenschappen".
5. Bij "Opnemen" doe je hetzelfde.
Requirements:
A digital multimeter that can measure frequencies of 1 kHz or higher. Many multimeters do not go beyond 200 or 400 Hz. If your multimeter is not suitable, you must calibrate at 200 or 400 Hz.
Windows adjustments:
- Right-click on the speaker icon at the bottom right corner of your screen (Windows 10) and select "Open Sound settings."
- Go to "Control Panel sound" at the top right of your screen.
- Open the "Playback" (line out) and "Recording" (line in) tabs.
- Under "Playback," select "Speakers" and go to "Properties."
- Do the same under "Recording."
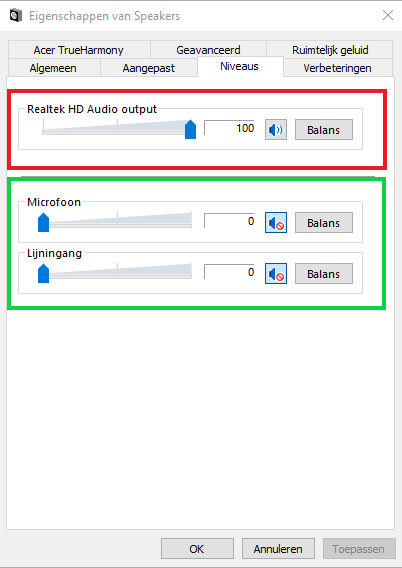

Onder "Niveaus" in "afspelen" en "opnemen", zet de lijn in- en uitgang op 100% en schakel de rest uit (klik op de foto's om te vergroten). Doe hetzelfde onder het tabblad "opnemen". Dit is één manier om te kalibreren. Je kunt ook de uitgang op 100% en de ingang op 75% zetten. Er zijn verschillende manieren, afhankelijk van de geluidskaart. Het doel is een zo laag mogelijke eigen vervorming van de geluidskaart.
Het komt erop neer dat je alles uitschakelt, behalve de line-in en line-out. Dus geen systeemgeluiden en geen special effects. Dit geldt ook voor Windows XP en 7, als je die nog gebruikt. Als je een speciale ASIO-driver voor je geluidskaart hebt, gebruik die dan. Je geluidskaart wordt dan rechtstreeks aangestuurd en Windows wordt als 'tussenpersoon' uitgeschakeld. Of gebruik ASIO4all, een algemene driver voor als er geen ASIO-driver bij je geluidskaart zit. ASIO4all werkt niet bij elke geluidskaart, dus dat is een kwestie van proberen.
Under "Levels" in "Playback" and "Recording," set the line input and output to 100% and disable the rest (click the pictures to enlarge). Do the same under the "Recording" tab. This is one way to calibrate. You can also set the output to 100% and the input to 75%. There are different methods depending on the sound card. The goal is to achieve the lowest possible distortion from the sound card.
The main point is to disable everything except the line-in and line-out. So, no system sounds and no special effects. This also applies to Windows XP and 7, if you still use those. If you have a special ASIO driver for your sound card, use it. Your sound card will then be controlled directly, bypassing Windows as the intermediary. Alternatively, use ASIO4all, a general driver for cases where your sound card does not come with an ASIO driver. ASIO4all does not work with every sound card, so it may require some trial and error.

- Ga naar "Geavanceerd" onder de tabbladen "Afspelen en Opnemen", en stel de gewenste "standaardindeling" in. Het ligt aan je geluidskaart welke mogelijkheden er zijn. Stel dit later ook zo in Arta in.
- Exclusief beheer niet aanvinken.
- Hardware-versnelling wel aanvinken.
- Onder tabblad "ruimtelijk geluid" alles uitzetten. Dat geldt ook voor de speciale effecten onder het tabblad "verbeteringen".
Je bent nu klaar in Windows.
- Go to "Advanced" under the "Playback" and "Recording" tabs, and set the desired "default format." The available options depend on your sound card. Later, set the same format in Arta.
- Do not check exclusive mode.
- Enable hardware acceleration.
- Under the "Spatial Sound" tab, turn everything off. This also applies to the special effects under the "Enhancements" tab.
You are now done in Windows.

Op de Arta-unit zet je de beide Gain knoppen op stand 1, en de twee schakelaars op on. Je hebt hiermee de linker input verbonden met de rechter input, en de rechter input verbonden met de linker output van de geluidskaart. Dat is de zogenaamde "loop" stand. De draaiknop moet op Cal. Staan. De schakelaars voor de koppelcondensatoren zet je op DC.
Power uiteraard op On.
On the Arta unit, set both Gain knobs to position 1 and the two switches to "on." This connects the left input to the right input and the right input to the left output of the sound card, known as the "loop" mode. The dial should be set to "Cal." Set the coupling capacitor switches to "DC."
Ensure the power is turned on.
Doe dit ook op de Computer of laptop.
- Start Arta op, ga naar "SPA" en dan "setup" en "audio devices".
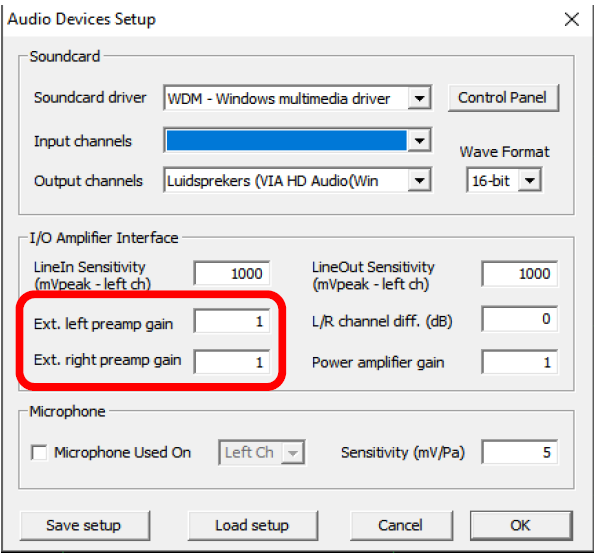
- Zet "Ext.left preamp gain" op 1. Het rechterkanaal laat je meestal altijd op 1 staan.
- Kies in het veld soundcard jouw eigen soundcard met de bijbehorende in- en uitgang.
- Bij “Wave format” kies je de resolutie wat je in Windows opgegeven hebt in "standaardindeling" of kies Float. Als je Windows 10 gebruikt wordt het aangeraden om Float te gebruiken. Als je een Asio-driver gebruikt wordt "Wave format" uitgeschakeld.
Do this on your computer or laptop as well.
-
Start Arta and go to "SPA" -> "Setup" -> "Audio Devices."
-
Set "Ext.left preamp gain" to 1. Typically, you leave the right channel at 1 as well.
-
In the "Soundcard" field, select your own sound card along with its corresponding input and output.
-
For "Wave format," choose the resolution that you set in Windows under "default format," or choose "Float." If you are using Windows 10, it's recommended to use "Float." If you are using an ASIO driver, "Wave format" will be disabled.

Het ijken:
- Start Arta, ga naar "SPA", en dan in "Setup" naar "Calibrate devices".
- Klik op "Generate Sinus", en meet met een multimeter de wisselspanning aan de linker output van de Arta-unit. Deze moet rond de 1 Vrms liggen of lager. Als de waarde veel hoger is dan 1 Vrms, bijvoorbeeld 1,5 Vrms, zet dan de output level op -6dB of nog lager. Klik opnieuw op "Generate Sinus" om de nieuwe waarde te activeren. Dit is nodig omdat de ingangsbuffers van de ARTA-2 Unit niet meer dan 1 Vrms aankunnen.
- Noteer de waarde die je nu krijgt, in mVrms in veld 3.
- Klik nogmaals op "Generate Sinus" om te stoppen en klik vervolgens op "Accept".
Calibration:
- Start Arta, go to "SPA", and then in "Setup" select "Calibrate devices".
- Click on "Generate Sine" and measure the AC voltage at the left output of the Arta unit using a multimeter. This should be around 1 Vrms or lower. If the value is much higher than 1 Vrms, for example, 1.5 Vrms, set the output level to -6dB or lower. Click "Generate Sine" again to activate the new value. This is necessary because the input buffers of the ARTA-2 Unit cannot handle more than 1 Vrms.
- Note the value you now get, in mVrms, in field 3.
- Click "Generate Sine" again to stop and then click "Accept".

Klik op veld 3, "Estimate Peak Input", en pas met de volumeknop van de Arta-unit de signaalsterkte aan zodat de balk net groen blijft. Gewoonlijk blijft de draaiknop op cal. (volledig open).
Herhaal indien nodig een paar keer. Meet vervolgens met de multimeter de waarde op de linker input van de Arta-unit en noteer deze waarde in mVrms in veld 2.
Belangrijk: Nadat je de waarde hebt ingevoerd, klik je opnieuw op "Estimate Peak Input" en daarna op "Accept". De waarden in "Estimated en current" moeten worden bijgewerkt.
Herhaal deze stappen voor het rechterkanaal. Klik op "OK" om te bevestigen en sluit af.
Click on field 3, "Estimate Peak Input," and adjust the signal strength with the volume knob of the Arta unit so that the bar just stays green. Usually, the knob remains on cal. (fully open).
Repeat if necessary a few times. Then measure the value on the left input of the Arta unit with the multimeter and record this value in mVrms in field 2.
Important: After entering the value, click "Estimate Peak Input" again and then "Accept." The values in "Estimated and current" should be updated.
Repeat these steps for the right channel. Click "OK" to confirm and close.

Ga in "SPA" naar "generator" en vervolgens naar "configure".
Stel de waarde van "level (dB FS)" in zodat "RMS Voltage" precies 1 Volt aangeeft. Of beter nog, meet met een multimeter de linker input van de Arta unit totdat deze precies 1 Volt weergeeft.
Pas nu ook de "level (dB FS)" in het rechterveld (blauw) aan. Deze moet 6 dB FS lager zijn dan de waarde in het linkerveld.
Het "Dither level" moet je testen. Ik kreeg het beste resultaat met het "Dither level" uitgeschakeld.
Klik op OK en sluit het venster.
In "SPA," go to "generator" and then to "configure."
Set the value of "level (dB FS)" so that "RMS Voltage" shows exactly 1 Volt. Alternatively, measure the left input of the Arta unit with a multimeter until it shows exactly 1 Volt.
Now adjust the "level (dB FS)" in the right field (blue). This should be 6 dB FS lower than the value in the left field.
You need to test the "Dither level." I achieved the best results with the "Dither level" disabled.
Click OK and close the window.

We zullen nu de kwaliteit van de geluidskaart testen en controleren of de kalibratie correct is uitgevoerd. Draai de volumeknop volledig open (Cal.) en laat de schakelaars in de aan-stand staan.
We will now test the quality of the sound card and check if the calibration was performed correctly. Turn the volume knob fully open (Cal.) and leave the switches in the on position.

Ga in "SPA" naar "Setup", vervolgens naar "Spectrum Scaling" en vul de volgende waarden in en selecteer ze:
"Scaling" op dB (V, SPL) en "Voltage Units" op dBV.
"Pressure Units" op "dB re 20 µPa".
Klik op 'OK' en sluit het venster.
In "SPA," go to "Setup," then to "Spectrum Scaling," and enter and select the following values:
Set "Scaling" to dB (V, SPL) and "Voltage Units" to dBV.
Set "Pressure Units" to "dB re 20 µPa".
Click 'OK' and close the window.

Klik op de rode pijl en gebruik de multimeter om te controleren of de 'Left input' van de Arta unit 0 dBV = 1 Vrms aangeeft.
Click on the red arrow and use the multimeter to check if the 'Left input' of the Arta unit shows 0 dBV = 1 Vrms.
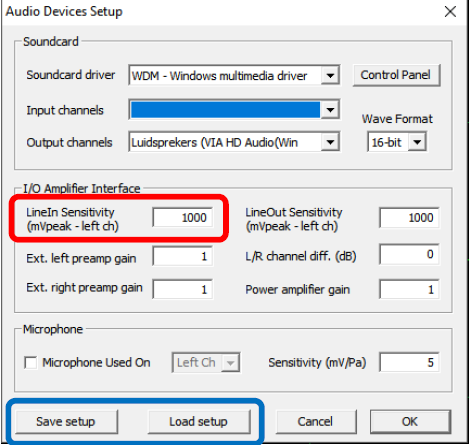
Het kan voorkomen dat de RMS-waarde na kalibratie + of - 0,1 dBV aangeeft. Dit kan gecorrigeerd worden door de "LineIn Sensitivity" waarde licht aan te passen. De uitgangsspanning van 1 Vrms blijft ongewijzigd.
Bewaar het kalibratiebestand daarna met "Save setup" en laad het bestand vervolgens opnieuw in Steps met "Load setup".
It may occur that the RMS value after calibration indicates + or - 0.1 dBV. This can be corrected by slightly adjusting the "LineIn Sensitivity" value. The output voltage of 1 Vrms remains unchanged.
Save the calibration file afterwards with "Save setup" and then reload the file in Steps with "Load setup."

Sluit nu Arta af en open het programma Steps. In Steps ga je naar "Setup", selecteer "Measurement" en wijzig het "Generator level" naar dezelfde waarde die je eerder in "Spa", "Generator", "Configure" en vervolgens in het linkerveld hebt ingevoerd. Je bent nu bijna klaar om de meting te starten.
Now close Arta and open the Steps program. In Steps, go to "Setup," select "Measurement," and change the "Generator level" to the same value you previously entered in "Spa," "Generator," "Configure," and then in the left field. You are now almost ready to start the measurement.
Arta vereist enkele aanvullende instellingen om betrouwbare metingen te kunnen uitvoeren. Deze worden besproken op de pagina 'extra instellingen'.
Arta requires some additional settings to perform reliable measurements. These are discussed on the 'extra settings' page.